> ## Documentation Index
> Fetch the complete documentation index at: https://training-docs.cerebras.ai/llms.txt
> Use this file to discover all available pages before exploring further.
# Pretrain Your First Model
> Follow this guide to pretrain your first model on a Cerebras system.
## Overview
This tutorial introduces you to Cerebras essentials, including data preprocessing, training scripts, configuration files, and checkpoint conversion tools. You'll learn these concepts by pretraining [Meta’s Llama 3 8B](https://huggingface.co/meta-llama/Meta-Llama-3-8B) on [40,000 lines of Shakespeare](https://huggingface.co/datasets/karpathy/tiny_shakespeare).
In this quickstart, you will:
* Set up your environment
* Preprocess a small dataset
* Pretrain and evaluate a model
* Convert your model checkpoint for Hugging Face
In this tutorial, you will train your model for a short while on a small dataset. A high quality model requires a longer training run, as well as a much larger dataset.
## Prerequisites
To begin this guide, you must have:
* Cerebras system access. If you don’t have access, contact Cerebras Support.
* Completed [setup and installation](../getting-started/setup-and-installation).
## Workflow
First, save the working directory to an environment variable:
```Bash theme={null}
export MODELZOO_PARENT=$(pwd)
```
Then, create a dedicated folder to store assets (like data and model configs) and generated files (such as processed datasets, checkpoints, and logs):
```Bash theme={null}
mkdir pretraining_tutorial
```
Next, copy the sample configs into your folder. These include model configs, evaluation configs, and data configs.
```Bash theme={null}
cp modelzoo/src/cerebras/modelzoo/tutorials/pretraining/* pretraining_tutorial
```
We use `cp` here to copy configs specifically designed for this tutorial. For general use with Model Zoo models, we recommend using `cszoo config pull`. See the [CLI command reference](../model-zoo/cli-overview#config:pull) for details.
Before moving on, inspect the configuration files you just copied to confirm that the parameters are set as expected.
To view the model config, run:
```Bash theme={null}
cat pretraining_tutorial/model_config.yaml
```
You should see the following content in your terminal:
```yaml theme={null}
########################################
## Pretraining Tutorial Model Config ##
########################################
trainer:
init:
model_dir: pretraining_tutorial/model
backend:
backend_type: CSX
cluster_config:
num_csx: 1
callbacks:
- ComputeNorm: {}
checkpoint:
steps: 18
logging:
log_steps: 1
loop:
eval_steps: 5
max_steps: 18
model:
attention_dropout_rate: 0.0
attention_module: multiquery_attention
attention_type: scaled_dot_product
dropout_rate: 0.0
embedding_dropout_rate: 0.0
embedding_layer_norm: false
extra_attention_params:
num_kv_groups: 8
filter_size: 14336
fp16_type: cbfloat16
hidden_size: 4096
initializer_range: 0.02
layer_norm_epsilon: 1.0e-05
loss_scaling: num_tokens
loss_weight: 1.0
max_position_embeddings: 8192
mixed_precision: true
nonlinearity: swiglu
norm_type: rmsnorm
num_heads: 32
num_hidden_layers: 32
pos_scaling_factor: 1.0
position_embedding_type: rotary
rope_theta: 500000.0
rotary_dim: 128
share_embedding_weights: false
use_bias_in_output: false
use_ffn_bias: false
use_ffn_bias_in_attention: false
use_projection_bias_in_attention: false
vocab_size: 128256
optimizer:
AdamW:
betas:
- 0.9
- 0.95
correct_bias: true
weight_decay: 0.01
precision:
enabled: true
fp16_type: cbfloat16
log_loss_scale: true
loss_scaling_factor: dynamic
max_gradient_norm: 1.0
schedulers:
- CosineDecayLR:
end_learning_rate: 1.0e-05
initial_learning_rate: 5.0e-05
total_iters: 18
seed: 1
fit:
train_dataloader:
batch_size: 8
data_dir: train_data
data_processor: GptHDF5MapDataProcessor
num_workers: 8
persistent_workers: true
prefetch_factor: 10
shuffle: true
shuffle_seed: 1337
val_dataloader: &id001
batch_size: 1
data_dir: valid_data
data_processor: GptHDF5MapDataProcessor
num_workers: 8
shuffle: false
validate:
val_dataloader: *id001
validate_all:
val_dataloaders: *id001
```
To view the evaluation config, run:
```Bash theme={null}
cat pretraining_tutorial/eeh_config.yaml
```
You should see the following content in your terminal:
```Bash theme={null}
##############################################################
## Pretraining Tutorial Eleuther Evaluation Harness Config ##
##############################################################
trainer:
init:
backend:
backend_type: CSX
cluster_config:
num_csx: 1
model:
model_name: llama
attention_dropout_rate: 0.0
attention_module: multiquery_attention
attention_type: scaled_dot_product
dropout_rate: 0.0
embedding_dropout_rate: 0.0
embedding_layer_norm: false
extra_attention_params:
num_kv_groups: 8
filter_size: 14336
fp16_type: cbfloat16
hidden_size: 4096
initializer_range: 0.02
layer_norm_epsilon: 1.0e-05
loss_scaling: num_tokens
loss_weight: 1.0
max_position_embeddings: 8192
mixed_precision: true
nonlinearity: swiglu
norm_type: rmsnorm
num_heads: 32
num_hidden_layers: 32
pos_scaling_factor: 1.0
position_embedding_type: rotary
rope_theta: 500000.0
rotary_dim: 128
share_embedding_weights: false
use_bias_in_output: false
use_ffn_bias: false
use_ffn_bias_in_attention: false
use_projection_bias_in_attention: false
vocab_size: 128256
callbacks:
- EleutherEvalHarness:
eeh_args:
tasks: winogrande
num_fewshot: 0
keep_data_dir: false
batch_size: 4
shuffle: false
max_sequence_length: 8192
num_workers: 1
data_dir: pretraining_tutorial/eeh
eos_id: 128001
pretrained_model_name_or_path: meta-llama/Meta-Llama-3-8B-Instruct
flags:
csx.performance.micro_batch_size: null
```
To view the data config, run:
```Bash theme={null}
cat pretraining_tutorial/train_data_config.yaml
```
You should see the following content in your terminal:
```yaml theme={null}
#############################################
## Pretraining Tutorial Train Data Config ##
#############################################
setup:
data:
type: "huggingface"
source: "karpathy/tiny_shakespeare"
split: "train"
mode: "pretraining"
output_dir: "pretraining_tutorial/train_data"
processes: 1
processing:
huggingface_tokenizer: "meta-llama/Meta-Llama-3-8B-Instruct"
write_in_batch: True
read_hook: "cerebras.modelzoo.data_preparation.data_preprocessing.hooks:text_read_hook"
read_hook_kwargs:
data_keys:
text_key: "text"
dataset:
use_ftfy: True
```
Use your data configs to preprocess your “train” and “validation” datasets:
```Bash theme={null}
cszoo data_preprocess run --config pretraining_tutorial/train_data_config.yaml
cszoo data_preprocess run --config pretraining_tutorial/valid_data_config.yaml
```
You should then see your preprocessed data in `pretraining_tutorial/train_data/` and `pretraining_tutorial/valid_data/` (see the `output_dir` parameter in your data configs).
When using the Hugging Face CLI to download a dataset, you may encounter the following error: `KeyError: 'tags'`
This issue occurs due to an outdated version of the `huggingface_hub` package. To resolve it, update the package by running:
`pip install --upgrade huggingface_hub==0.26.1`
An example of a “train” dataset looks as follows:
```Bash theme={null}
{
"text": "First Citizen:\nBefore we proceed any further, hear me "
}
```
If you are interested, you can read more about the [various parameters](../model-zoo/components/data-preprocessing/input-data-configuration) and [pre-built utilities](../model-zoo/components/data-preprocessing/data-preprocessing) for preprocessing common data formats. You can also follow end-to-end tutorials for various use cases such as [instruction fine-tuning](../model-zoo/tutorials/instruction-fine-tuning-for-llms) and [extending context lengths using position interpolation](../model-zoo/tutorials/extend-context-length-using-position-interpolation).
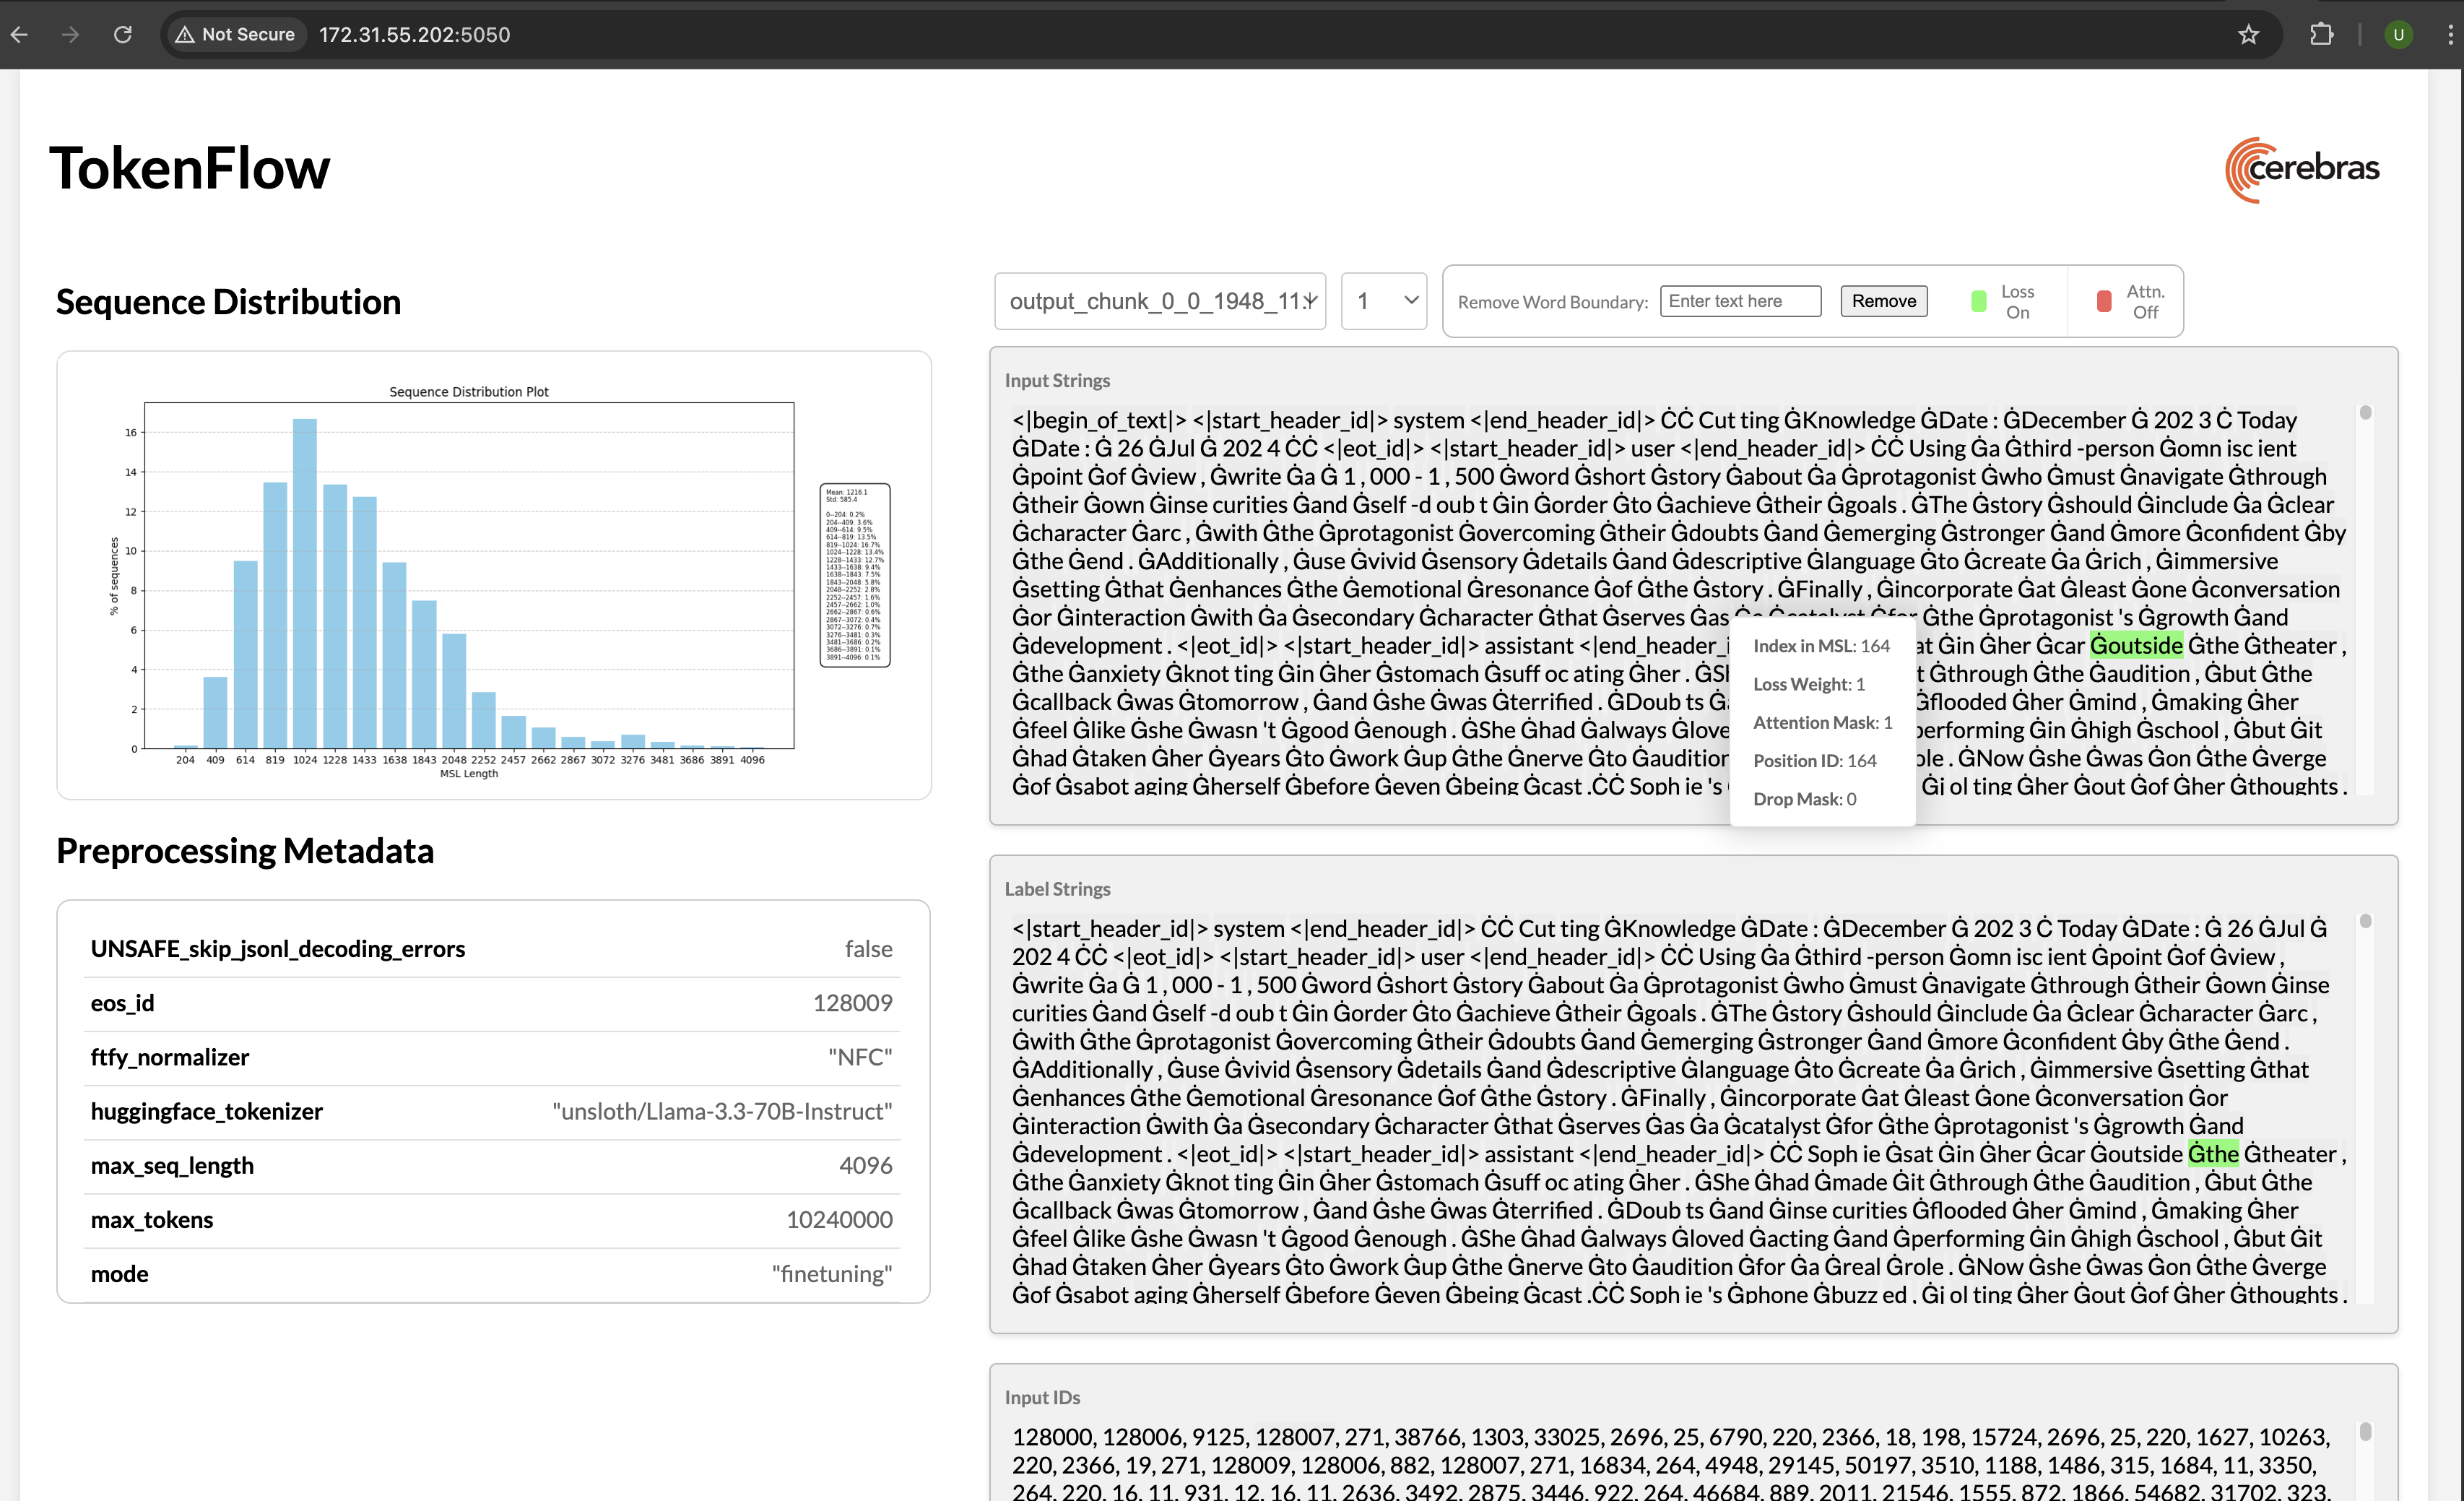
Once you’ve preprocessed your data, you can visualize the outcome:
```Bash theme={null}
python $MODELZOO_PARENT/modelzoo/src/cerebras/modelzoo/data_preparation/data_preprocessing/tokenflow/launch_tokenflow.py \
--output_dir pretraining_tutorial/train_data
```
In your terminal, you will see a url like [`http://172.31.48.239:5000.`](http://172.31.48.239:5000) Copy and paste this into your browser to launch [TokenFlow](../model-zoo/components/data-preprocessing/visualization-and-debugging), a tool for interactively visualizing whether loss and attention masks were applied correctly:
 Update `train_dataloader.data_dir` and `val_dataloader.data_dir` in your model config to use the absolute paths of your preprocessed data:
```Bash theme={null}
sed -i "s|data_dir: train_data|data_dir: ${MODELZOO_PARENT}/pretraining_tutorial/train_data|" \
pretraining_tutorial/model_config.yaml
sed -i "s|data_dir: valid_data|data_dir: ${MODELZOO_PARENT}/pretraining_tutorial/valid_data|" \
pretraining_tutorial/model_config.yaml
```
Now you're ready to launch training. Use the cszoo fit command to submit a job, passing in your updated model config. This command automatically uses the locations and packages defined in your config. Click [here](../fundamentals/launch-your-job) for more information.
```Bash theme={null}
cszoo fit pretraining_tutorial/model_config.yaml --mgmt_namespace
```
You should then see something like this in your terminal:
```
Transferring weights to server: 100%|██| 1165/1165 [01:00<00:00, 19.33tensors/s]
INFO: Finished sending initial weights
INFO: | Train Device=CSX, Step=50, Loss=8.31250, Rate=69.37 samples/sec, GlobalRate=69.37 samples/sec
INFO: | Train Device=CSX, Step=100, Loss=7.25000, Rate=68.41 samples/sec, GlobalRate=68.56 samples/sec
...
```
Once training is complete, you will find several artifacts in the `pretraining_tutorial/model` folder (see the `model_dir` parameter in your model config). These include:
* Checkpoints
* TensorBoard event files
* Run logs
* A copy of the model config
### Inspect Training Logs
Monitor your training during the run or visualize TensorBoard event files afterwards:
```Bash theme={null}
tensorboard --bind_all --logdir="pretraining_tutorial/model"
```
Once you train (and evaluate) your model, you can [port it](../model-zoo/migration/port-a-trained-and-fine-tuned-model-to-hugging-face) to Hugging Face to generate outputs:
```Bash theme={null}
cszoo checkpoint convert --model llama --src-fmt cs-auto --tgt-fmt hf --config pretraining_tutorial/model_config.yaml --output-dir pretraining_tutorial/to_hf pretraining_tutorial/model/checkpoint_0.mdl
```
This will create both Hugging Face config files and a converted checkpoint under `pretraining_tutorial/to_hf`.
You can now generate outputs using Hugging Face:
```Bash theme={null}
pip install 'transformers\[torch\]'
```
```Bash theme={null}
python
```
```Bash theme={null}
Python 3.8.16 (default, Mar 18 2024, 18:27:40)
[GCC 8.4.0] on linux
Type "help", "copyright", "credits" or "license" for more information.
>>> from transformers import AutoTokenizer, AutoModelForCausalLM, AutoConfig
>>> from transformers import pipeline
>>> tokenizer = AutoTokenizer.from_pretrained("meta-llama/Meta-Llama-3-8B-Instruct")
>>> config = AutoConfig.from_pretrained("pretraining_tutorial/to_hf/model_config_to_hf.json")
>>> model = AutoModelForCausalLM.from_pretrained(pretrained_model_name_or_path="pretraining_tutorial/to_hf/checkpoint_0_to_hf.bin", config = config)
>>> text = "Generative AI is "
>>> pipe = pipeline("text-generation", model=model, tokenizer=tokenizer)
>>> generated_text = pipe(text, max_length=50, do_sample=False, no_repeat_ngram_size=2, eos_token_id=pipeline.tokenizer.eos_token_id, pad_token_id=pipeline.tokenizer.eos_token_id)[0]
>>> print(generated_text['generated_text'])
>>> exit()
```
As a reminder, in this quickstart, you did not train your model for very long. A high quality model requires a longer training run, as well as a much larger dataset.
## Conclusion
Congratulations! In this tutorial, you followed an end-to-end workflow to pretrain a model on a Cerebras system and learn about essential tools and scripts.
As part of this, your learned how to:
* Setup your environment
* Preprocess a small dataset
* Pretrain and evaluate a model
* Port your model to Hugging Face
## What’s Next?
* Learn how to [fine-tune your first model](../getting-started/fine-tune-your-first-model)
* Learn more about [data preprocessing](../model-zoo/components/data-preprocessing/data-preprocessing)
* Learn more about the [Cerebras Model Zoo](../model-zoo/model-zoo-overview) and the different models we support
Update `train_dataloader.data_dir` and `val_dataloader.data_dir` in your model config to use the absolute paths of your preprocessed data:
```Bash theme={null}
sed -i "s|data_dir: train_data|data_dir: ${MODELZOO_PARENT}/pretraining_tutorial/train_data|" \
pretraining_tutorial/model_config.yaml
sed -i "s|data_dir: valid_data|data_dir: ${MODELZOO_PARENT}/pretraining_tutorial/valid_data|" \
pretraining_tutorial/model_config.yaml
```
Now you're ready to launch training. Use the cszoo fit command to submit a job, passing in your updated model config. This command automatically uses the locations and packages defined in your config. Click [here](../fundamentals/launch-your-job) for more information.
```Bash theme={null}
cszoo fit pretraining_tutorial/model_config.yaml --mgmt_namespace
```
You should then see something like this in your terminal:
```
Transferring weights to server: 100%|██| 1165/1165 [01:00<00:00, 19.33tensors/s]
INFO: Finished sending initial weights
INFO: | Train Device=CSX, Step=50, Loss=8.31250, Rate=69.37 samples/sec, GlobalRate=69.37 samples/sec
INFO: | Train Device=CSX, Step=100, Loss=7.25000, Rate=68.41 samples/sec, GlobalRate=68.56 samples/sec
...
```
Once training is complete, you will find several artifacts in the `pretraining_tutorial/model` folder (see the `model_dir` parameter in your model config). These include:
* Checkpoints
* TensorBoard event files
* Run logs
* A copy of the model config
### Inspect Training Logs
Monitor your training during the run or visualize TensorBoard event files afterwards:
```Bash theme={null}
tensorboard --bind_all --logdir="pretraining_tutorial/model"
```
Once you train (and evaluate) your model, you can [port it](../model-zoo/migration/port-a-trained-and-fine-tuned-model-to-hugging-face) to Hugging Face to generate outputs:
```Bash theme={null}
cszoo checkpoint convert --model llama --src-fmt cs-auto --tgt-fmt hf --config pretraining_tutorial/model_config.yaml --output-dir pretraining_tutorial/to_hf pretraining_tutorial/model/checkpoint_0.mdl
```
This will create both Hugging Face config files and a converted checkpoint under `pretraining_tutorial/to_hf`.
You can now generate outputs using Hugging Face:
```Bash theme={null}
pip install 'transformers\[torch\]'
```
```Bash theme={null}
python
```
```Bash theme={null}
Python 3.8.16 (default, Mar 18 2024, 18:27:40)
[GCC 8.4.0] on linux
Type "help", "copyright", "credits" or "license" for more information.
>>> from transformers import AutoTokenizer, AutoModelForCausalLM, AutoConfig
>>> from transformers import pipeline
>>> tokenizer = AutoTokenizer.from_pretrained("meta-llama/Meta-Llama-3-8B-Instruct")
>>> config = AutoConfig.from_pretrained("pretraining_tutorial/to_hf/model_config_to_hf.json")
>>> model = AutoModelForCausalLM.from_pretrained(pretrained_model_name_or_path="pretraining_tutorial/to_hf/checkpoint_0_to_hf.bin", config = config)
>>> text = "Generative AI is "
>>> pipe = pipeline("text-generation", model=model, tokenizer=tokenizer)
>>> generated_text = pipe(text, max_length=50, do_sample=False, no_repeat_ngram_size=2, eos_token_id=pipeline.tokenizer.eos_token_id, pad_token_id=pipeline.tokenizer.eos_token_id)[0]
>>> print(generated_text['generated_text'])
>>> exit()
```
As a reminder, in this quickstart, you did not train your model for very long. A high quality model requires a longer training run, as well as a much larger dataset.
## Conclusion
Congratulations! In this tutorial, you followed an end-to-end workflow to pretrain a model on a Cerebras system and learn about essential tools and scripts.
As part of this, your learned how to:
* Setup your environment
* Preprocess a small dataset
* Pretrain and evaluate a model
* Port your model to Hugging Face
## What’s Next?
* Learn how to [fine-tune your first model](../getting-started/fine-tune-your-first-model)
* Learn more about [data preprocessing](../model-zoo/components/data-preprocessing/data-preprocessing)
* Learn more about the [Cerebras Model Zoo](../model-zoo/model-zoo-overview) and the different models we support